Sooo…I titled this post farmhouse nightstand makeover because that’s what sparked this whole post. But I realized as I was putting it together that it’s really a good lesson in decorating on a budget as well. This is my master bedroom shown in the photo and I’ve been slowly working on updating this room. I mean, really slowly!
Ok, so nightstands first. Here is the (really horrific) before photo of the nightstands I was working with.

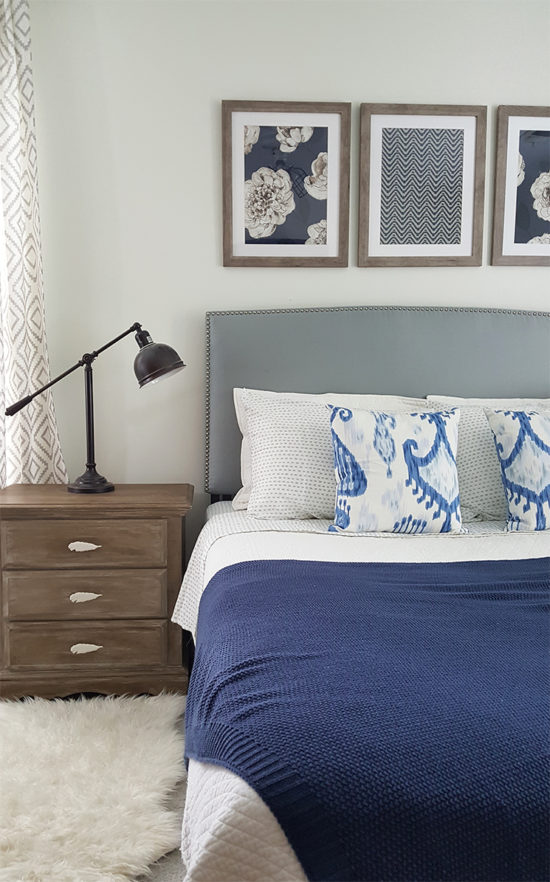
After I updated the dresser in my daughter’s room, I wanted to tackle some of the outdated furniture in my room. Starting with these nightstands. They had an orange-y wood tone and ugly pulls that needed changing. As always, I got out the chalk paint (this is not a sponsored post, but really Annie Sloan you should be sponsoring me at this point!) this time I decided to use the Paris Gray. I won’t go into the whole how-to again since I just shared it with the dresser makeover from last week.
The only difference with this one, is that the new drawer pulls I picked out had one screw as opposed to the two with the old pulls. I used wood filler to fill the existing holes, and sanded it down after it was dry. I painted the drawers with the first coat of paint before doing this which was a mistake, because I ended up sanding the paint right off.

My husband drilled a new hole in the center of each drawer for me for my new pulls. I picked these pulls up about a year ago at Anthropologie. They were in the clearance bin. The regular price (for one!) was $15, but they were marked down to $2.75. I loved them, so I grabbed all that was left – which was 7 of them.

Aren’t they so cute? So now that the nightstand were done, I needed to pull together the rest of the room. When we first moved into our house 15 years ago we went out and bought a whole matching set of bedroom furniture. We were SO happy with it at the time! But times change, and things go out of style. I had gotten rid of the headboard and footboard a few years ago and didn’t replace it for a long time. So for years, we had a bed without a headboard and a big blank wall above it. Finally, I broke down and bought a gray upholstered headboard from One King’s Lane.
About a year after that I was inspired to DIY wall decor after I saw something similar at Pottery Barn that was far out of my price range. Using fabric samples and frames I got on sale, I made my own version of the PB wall art for a fraction of the price, you can see the full how-to on that here.

Around that time, I repainted the wall from a light blue to white. Then it sat for quite a while. New wall decor and a new headboard. I still had the ugly nightstands and plain white curtains on the window. So I slowly started building from those items I already had. One day a trip to Home Goods turned up new curtains. Which I decided to put away in my closet until I had more pieces. A few months later, I found the gray and white sheets at Marshalls, which I also stored away.

After that, I found the blue and white pillows from Pillow Central in that pattern that I just love! Remember my DIY Serving tray? Next, I bought the white pillow shams from Pottery Barn. If you buy what you love, a little at a time as you can afford to it will eventually add up to a room you love. It just take patience (which I struggle with!).
Lastly, I had ordered a blue throw blanket from Pottery Barn online. Once I had gotten it, I was not at all happy with the color or the fabric. Then while food shopping in Shop Rite of all places, I found this beautiful blue textured throw…for under $10! More expensive isn’t always better!!

Nelson was quick to test out that inexpensive throw blanket, and he happily approved of it as well as the farmhouse nightstand makeover.

With decorating, as with life, small changes over a period of time add up to big improvements. Now, I just have to finish the other side of the room. Good thing I love the process! 

p.s. I just realized that I have never shared this room on the blog before – it was in that sad of shape! Keep in mind no matter how bad the before (check!) or how broke you are (check!) you can create a space you love on a budget!
(adsbygoogle = window.adsbygoogle || []).push({});