It’s week 5 of the One Room Challenge! Yikes, did these last few weeks fly by! This week was all about installing vinyl floors. I have been wanting to replace the old carpeting in our home for a very long time, so when the day finally came to rip those out and get these beauties installed, I was beyond thrilled!
My husband is usually the one who installs flooring around here, but this time we did it together. I wanted to learn for myself how to do and I was surprised to find that installing vinyl floors was much less complicated than I expected. If I can do it, you definitely can too!
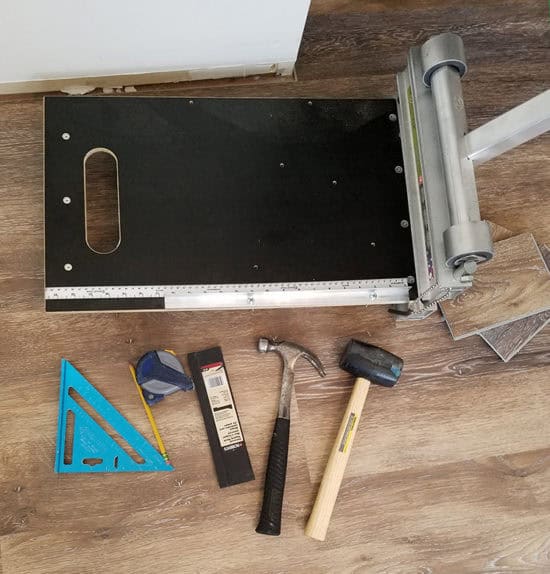
What You Will Need:
Lifeproof Luxury Vinyl Plank Flooring
Pencil
Floor Cutter (highly recommended!)
Jigsaw or Shears for irregular cuts (not pictured)
Spacers (not pictured)
Step 1 – Planning:
Most importantly, you will want to do your research and pick the right floors. A blogger friend recommended Lifeproof Luxury Plank Flooring (previously referred to as Allure ISOCORE, they are currently undergoing a name change) to me. The first thing I asked about was installing the underlayment. I was shocked when she told me that these floors had the underlayment built right in, completely eliminating that whole step! Honestly, I thought it was too good to be true and I questioned the company on it, and they assured me that it is indeed true. That alone makes these floors stand out, saving you time, money and labor.

Step 2 – Preparing Sub Floor
By subfloor, I mean whatever was under your existing floors before. When we pulled up the carpets we found staples attached to the wood boards underneath. All of these must be removed prior to install. It has to be a clean, flat surface. This was the worst part of installing the new floors, and I plan to do a separate post on how to remove carpeting next week.
Step 3 – Fix Squeaky Floors
This is the time to fix those annoying squeaky floorboards. When you find a squeaky spot, simply drill a drywall screw in the subfloor next to the nail in that area. It’s easy and it works!
Step 4 – Installing Vinyl Floors:
My husband really liked the finish on the Lifeproof Multi-Width Walton Oak Luxury Vinyl Plank Flooring so that is what we chose. I liked the varied wood tones of the wood and the different sized planks. When installing there are several patterns you can make with the multiplanks, so you will need to plan ahead before you begin so that you have an idea of your layout. None of the patterns are complicated to do.
We followed the easy directions from the back of the box, which recommends beginning in a corner and proceeding out from there. Each piece of flooring has a tongue and groove on two sides, this is important to pay attention to. You want the tongue facing the wall on the first row. Use the spacers between these first planks and the wall, the space will be covered by the molding later. We began ours in the closet and the alcove of the entry door.
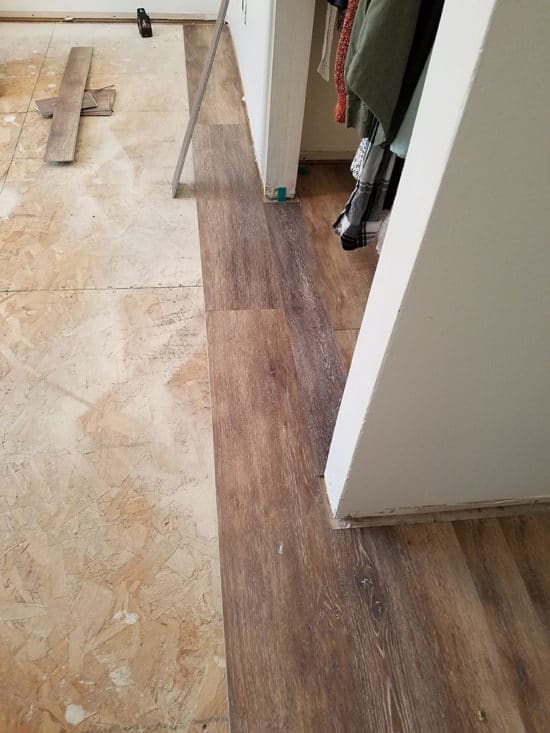
Once we got past that section, it was really easy. The floors snap together with the tongue and grooves. Be sure to stagger the seams so they don’t line up. This sort of happens naturally. When you get to the last piece in a row you’ll have to cut a plank to fit. We used the piece we cut off to begin the next row, and in doing that the seams were naturally staggered.
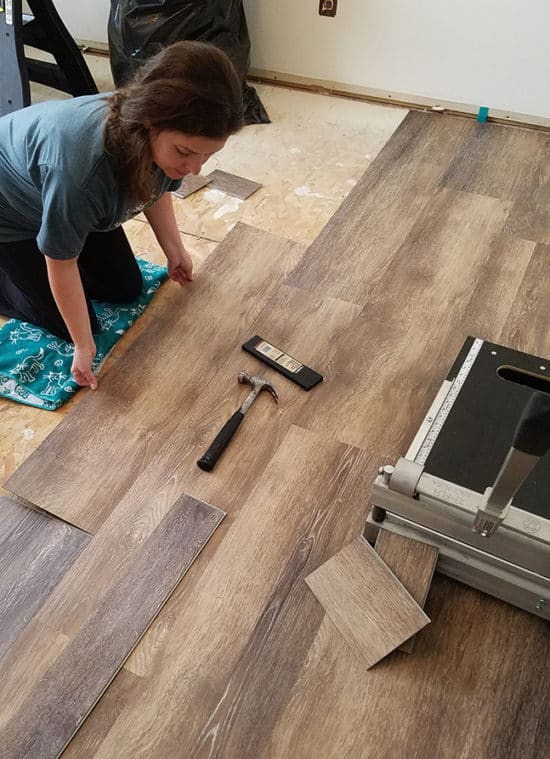
Once you put the plank in place, you use the tapping block and the hammer to make sure it’s flush with the neighboring plank. A hammer with a smaller head helps make this part a little easier.
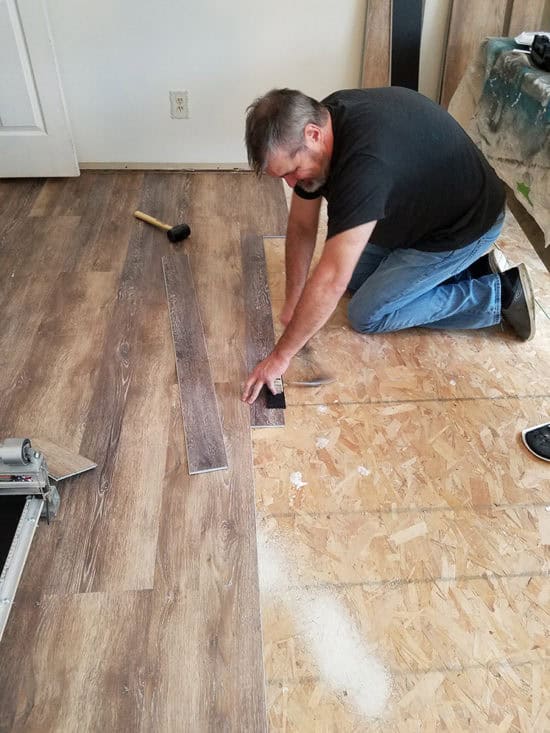
When you are tapping it into place, be careful the entire floor doesn’t shift. We found that if one of us stood on the neighboring plank while the other one was tapping it would keep things in place. If you’re installing alone, positioning yourself on the new floor rather than on the subfloor will keep it in place.
To cut down planks at the end of each row we used a floor cutter. My contractor told us about this and he let us borrow his for the install. It made cutting them so easy and they came out perfectly straight. We used a straight edge and a pencil to mark where the plank needed to be cut and then popped it into the floor cutter, which works just like a paper-cutter.
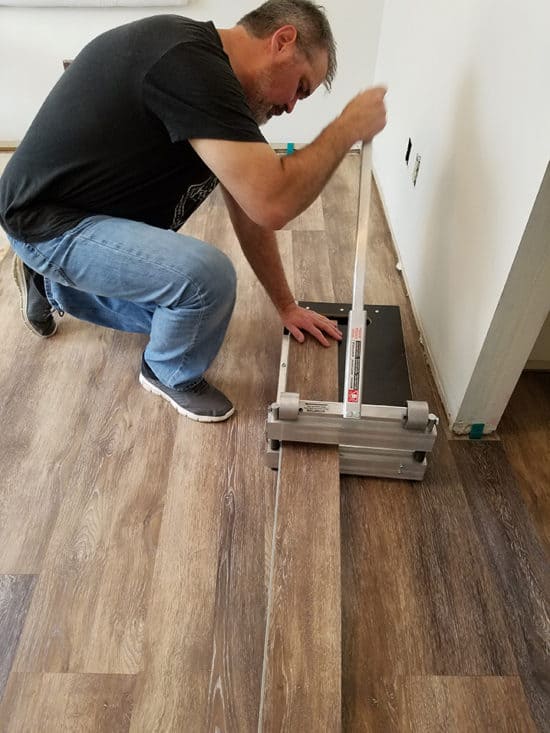
Be sure you are cutting the correct side of the planks so that they line up with the neighboring plank. We only cut one plank wrong this day (and it wasn’t me!) but we were able to reuse it elsewhere. To cut around floor vents we marked the plank with the straight edge and pencil and then we cut it out with a jigsaw. You could also use shears for this if you don’t have a jigsaw or a multi-max type tool.

That’s really all there is to installing vinyl floors! We used nine boxes to cover this room which is approximately 12′ X 14′. It says right on the box that these are the easiest floors ever, and I would agree with that. You really don’t need any power tools to install these, and anyone can do it themselves.

I absolutely love the variation of the wood tones on the Walton Oak, and the multi-width planks give it added interest. I feel that these floors really make the whole room. Without them, the rest of my design would have fallen flat. I would definitely use this flooring again in other rooms of my house. A huge thank you to the Home Depot for sponsoring the floors for my One Room Challenge bedroom makeover!
If you’ve missed the previous weeks of my bedroom makeover you can catch up below.
Week 1 – Bedroom Makeover Before
Week 2 – Bedroom Makeover Progress
Week 3 – Wall Art
Week 4 – Installing Layered Crown Molding

Next week is the big reveal and I still have lots to do! Wish me luck. And send wine!

(adsbygoogle = window.adsbygoogle || []).push({});