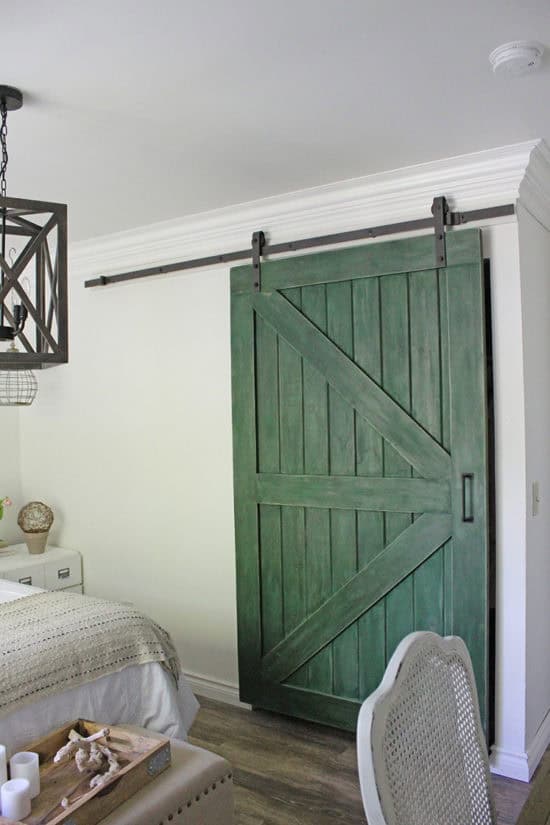
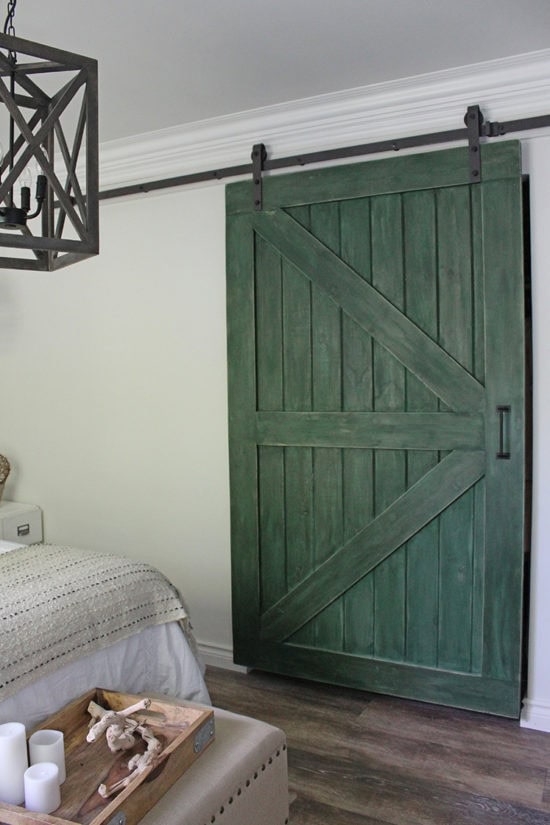
Thank you all for the positive feedback on my recent bedroom makeover. You all really loved the green sliding barn door so much I wanted to share how we built it in case anyone is interested in making one for yourselves. You can find pre-made sliding barn doors at the home improvement stores but you’ll pay between $400-$500 for one. The total cost of materials for ours, including the hardware was under $200.
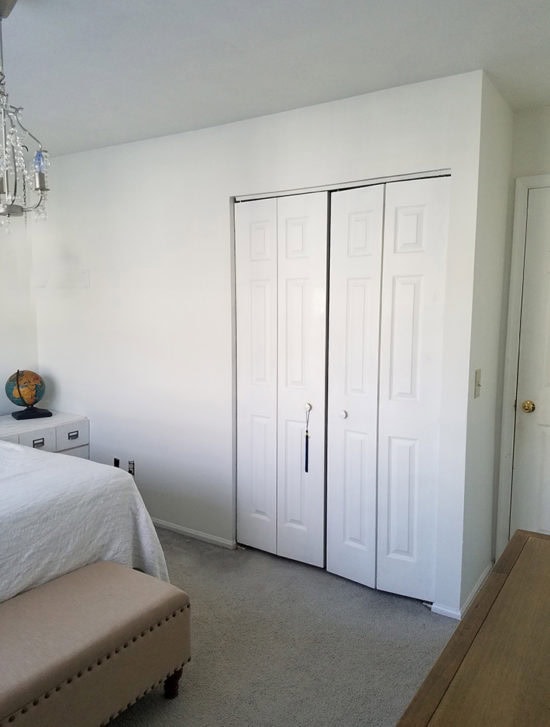
We wanted our door to cover the closet so we could get rid of the existing bi-fold doors. The width of our closet is 4′ so we constructed our sliding barn door to be 4′ wide and 7′ tall.
Tools Needed*:
Tape Measure
Materials Needed:
1″ X 6″ X 8′ Tongue and Groove Shiplap
1″ X 6″ X 8′ Pine
1″ X 4″ X 8′ Oak for Guide Rail Support
Coarse Drywall Screws 1″
Countersink Bit
How To Build A Sliding Barn Door:
First you will need to measure the size of your door opening and determine the width and height you want your door to be. Our door opening is 4′ wide, so we built ours to be 4′ wide and 7′ tall. The tongue and groove shiplap is the base of our door so we trimmed each of those planks to 7′ tall. We also had to alter one of ours vertically to get it to our desired width of four feet.
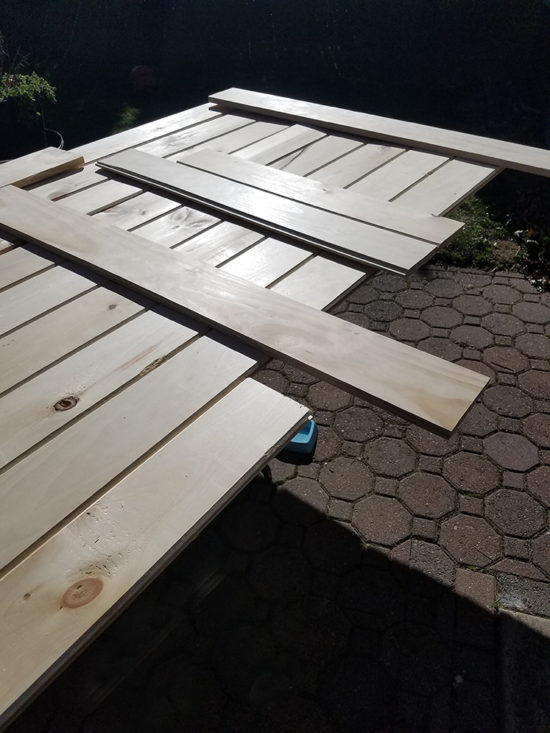
Lay the shiplap planks flat & attach them together with the tongue & grooves. Be sure all pieces are in place. Remeasure, and then frame the 1 X 6 pine on top of the shiplap.

Use wood clamps to hold the pine in place at this point and add your diagonal pieces.
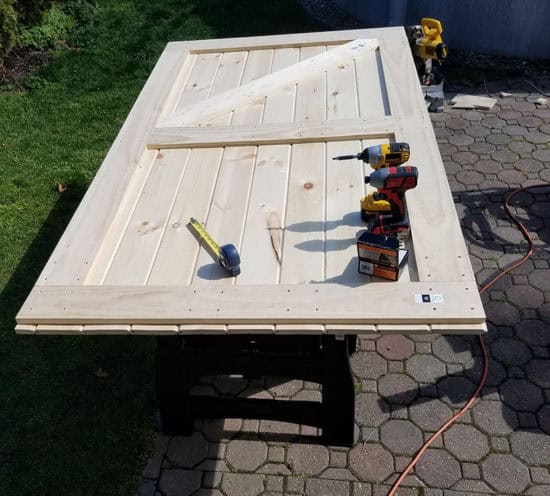
Mark holes for the countersink bit evenly to assure the 1 X 6 pine will be secured to the shiplap. Drill holes with the countersink bit, be sure to only drill down enough to flush the head of screw into the 1 X 6 frame. We used a 4-hole pattern distributed evenly around the frame of the door. If you want a really rustic look you can leave the holes exposed, we filled ours in, as you can see below.

Lay your door hardware on the frame (as shown above), measure and mark where you will need to drill holes for the door guides. Do the same for the handle. We drilled the holes but didn’t attach the hardware at this point because I wanted to paint the door first.

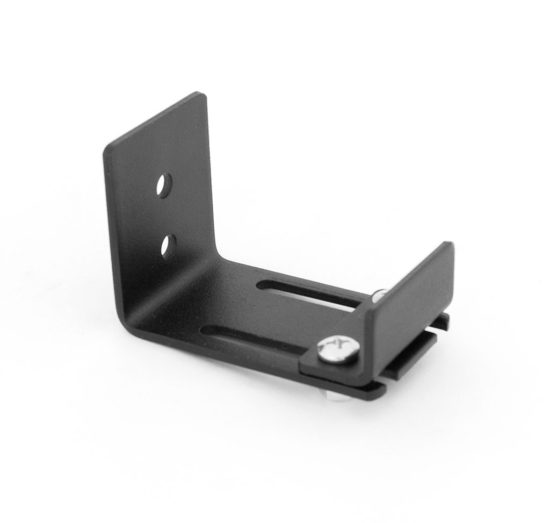
We bought our hardware kit from Ebay, because it was far cheaper than anywhere else that I looked. They had 6′ and 8′ hardware kits available. We of course bought the 8′ but if you are doing a standard size doorway, you will likely need the six-foot. Our kit included everything we needed (except the handle) including the floor guide. When using the floor guide you need to route the bottom of the door to create a track for the guide. We routed a 3/8 channel across the bottom of the door. ( you will need clamps and a piece of scrap wood to clamp the router guide as shown above).

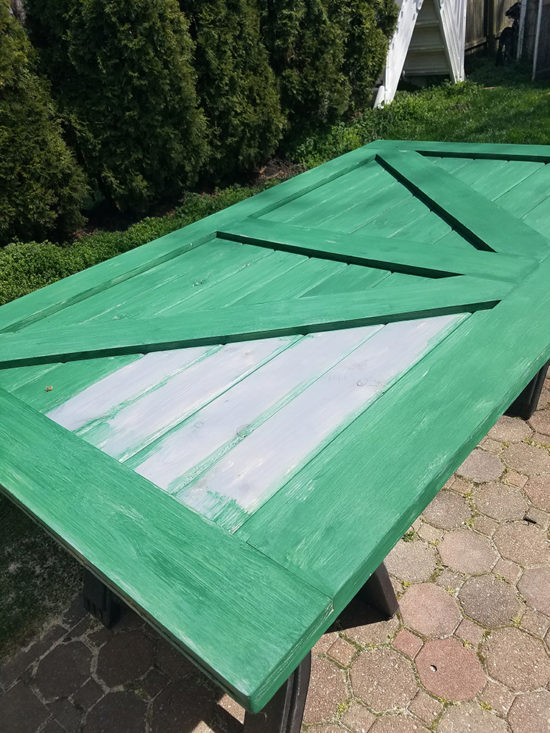
At this point I painted the sliding barn door. I first used Rust-oleum weathered gray stain, followed by chalk paint in green. I slightly sanded and distressed the door with a sanding sponge once the green was dry. I finished with a coat of dark wax for chalk paint. I considered giving it a DIY weathered wood finish but opted for green in this room instead.
How to Hang the Sliding Barn Door:
To hang the door, we first hung the piece of oak on the wall to attach the track to for added support. Find where the studs are and mark with a pencil above and below each stud the length of the oak support, Find your center point and level for the oak support piece. Drill holes for the hardware to attach to the oak piece to the wall. We painted our oak the same color as the walls so it would blend in. Attach lag bolts to oak piece and secure with a cordless ratchet driver.

Once the piece is secured to the wall, you can lay out the support rail onto the oak piece. Mark the rail support holes to the oak piece. Drill a pilot hole for attaching the rail hardware to the oak. Attach top rail hardware and make sure it’s level and secure. Hang barn door onto top rail guide and check that it’s sliding properly.
Hardware for the Bottom of the Sliding Barn Door:
Next, install bottom guide to the floor or molding. Our hardware kit came with the floor guide, but once we had installed new flooring in this room I really didn’t want to drill into it. So we ended up ordering this wall guide that attaches to the baseboard molding instead. We have yet to install that.
It’s definitely a major improvement from the bi-fold closet door that was here before.
You can see the full bedroom makeover here.
*This post contains affiliate links, read my full disclosure here.


(adsbygoogle = window.adsbygoogle || []).push({});