 Let me apologize in advance for the lack of pretty pictures today. This project was a messy one, as you will see! One thing I have wanted to do forever in my house is to remove the outdated flooring that we have downstairs and replace it all with new matching wood floors. We had tile in our tiny entry, carpet in the living room (you can see pics of the living room here) and plank flooring in the kitchen. I really disliked the carpet, so I always kept a large area rug over it, which sort of added to the crazy mishmash of flooring I had going on. I am happy to say my husband and I have finally started this project! We began by removing all of the old flooring, and I wanted to share with you today how to remove tile. Although I would say this is something you can do yourself, it was NOT FUN.
What You Will Need*:
A Chiropractor (just kidding)
This is one time I was really happy to have a small foyer. If this were a larger space I might suggest hiring out because it is tough work to get old tiles up. I started it myself one day while my husband was at work to see if I was able to get any of them up. The most important thing to remember with this project is to wear safety glasses and gloves and to keep kids and pets far away. When the tile starts popping up, it flies everywhere.

How To Remove Tile
We had removed the carpeting first, so I was able to access the tiles from the side. If you don’t have that option, break up the first tile with the blunt side of a hammer. I wedged a flat head screwdriver under the tile and hammered it until it slid underneath. There were times I couldn’t get it under but I found if I moved it around I would eventually find a spot where I could get a little leverage. I would hammer it until I heard a little suction noise and then I was able to pop the tile up, though it came up in pieces.
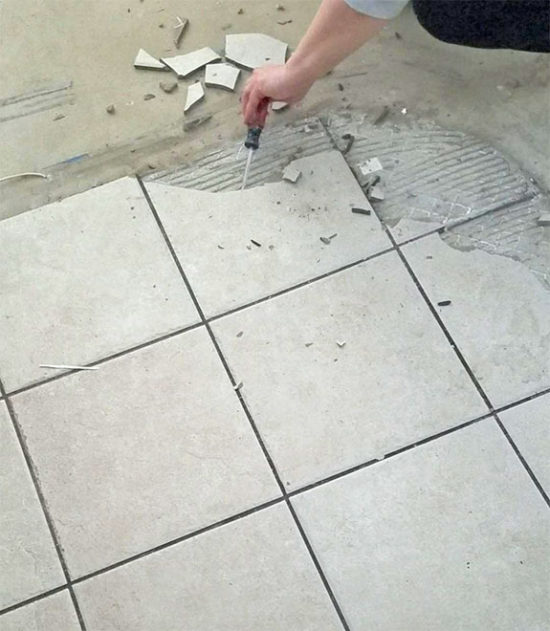
Some came up in big pieces and some came up in tiny pieces, but it wasn’t terrible getting it up. 
Sidenote: I should also mention at this point that the yellow line around the wall is there because I also removed the chair rail (learn how easy it is to remove moldings yourself here) that we had in this room, we plan to add board and batten in this space once the floors and moldings are done.

Once the tiles were up, it was what was underneath that was kind of a nightmare. All the mastic from the tiles was stuck to the cement floor underneath.

I believe there is a machine you can rent or buy to get this stuff up, but for such a small area I didn’t think it was worth it. So we chiseled it off by hand. Ugh! My husband used this type of chisel.

I found this one was easier for me, it was more lightweight and this is also worked as a sander/scraper. I also use a hammer and most tools from my own little toolkit because they are smaller and easier to handle for me than my husband’s heavier tools.

This little 5 x 4 space took us quite awhile to clear that mastic out. It was very slow going because it only comes up in tiny pieces. I had to keep reminding myself, “This will be worth it. This will be worth it!”, while my husband’s motto was “I love my wife, I love my wife”. You may have seen a snippet of him working on this in my Instagram stories a week or so ago.
It was tedious and exhausting. I could barely lift my arms to brush my hair the next day because I was so sore. There were some areas where we got some of it off but not all. In those spots, I was able to use the smaller chisel as a sander/scraper and flatten those areas out that way.
We have the new floors installed now, which I’ll show you as soon as we get the moldings back up. I’m not going to write a how-to post on putting those in because it was exactly the same process we used when we installed the vinyl plank flooring in my daughter’s room. I will say now that they’re in, it really was totally worth it.  Here’s a peek at them, as I mentioned we still have to replace the moldings.

If you have outdated tile like we did and aren’t ready to remove it just yet, see how I updated the tile floors in my bathroom – the easy way!
*This post contains affiliate links, you can read my full disclosure here.
The post How to Remove Tile (Ugh!) appeared first on .